I have been working on a Dannevirke scenario off and on for several months. I finally had it ready for playtesting, so it was to be our Saturday in January’s Day of Battle scenario.
It turned out that it was the prefect scenario for that day as the big winter storm swept through. Snow on the table, snow outside. So much snow in fact that no one was able to come to the house. Rather than letting the weather defeat me, I went ahead and playtested the scenario a la solo (it was either that or shovel the driveway/sidewalks).

The play-through was enjoyable, but I made several rule mistakes and missed some obvious moves. It had been a few months since I had played BBB so I was a bit rusty. As I had everything set-up and nowhere to go, I decided to play another game on Sunday. That game is the one detailed below, but I will include comments from the first playtest where appropriate.
The scenario was based on if the Danes had decided to hold the Dannevirke instead of retreating on 5-6 February 1864. I held to the historical placement of troops as much as I could. One unexpected problem was the historical Allied plan had the I.Korps to cross the Slein east of Slesvig along with the Combined Cavalry Division and the Reserve Artillery. This removes almost half the Allied infantry and the bulk of their artillery and cavalry. More importantly, the Allied commander, Field Marshal Wrangle, had the Austrian II.Korps and the Prussian III.Korps remain in the cantonments until the I.Korps successfully cross the Sliein and forced the Danes out of their positions. That meant there wasn’t a historical plan of attack against the Dannevirke to work from.
The Danes had the 1.Division covering the Slien with the 4.Bde of the 2.Division to the west at Frederiksstadt, This meant that four of the 10 Danish infantry brigades were absent from the battle area. I was worried that the Danish position would prove to be too strong to make an enjoyable scenario. Actually I needed not to have worried.
I used three scenario rules. One was the freezing of the Reide flood areas and the second was limited visibility. On a 1-2 (one D6), the Reide and the flooded areas would be frozen over allowing infantry to cross. On a second roll 1-2 (D6) visibility would be limited to 12” due to snow and wind. In a two-player game, the Danes would set-up first, then the two die rolls, after which the Allies would set-up. Allies moved first. This meant the Danish player had to think through both situations in his defensive planning. The third was that the Dannevirke Artillery couldn’t move or pivot, so its fields of fire were set. One scenario rule I considered but rejected was a -1 for shooting at units in the knicks. The given the level of the rules, I felt this was unnecessary. I also considered making the Austrian unit aggressive, but decided not to do so.
Bloody Big Battles was once again the rule set. I used my normal house rules:
- +2 for movement outside of 12”, but only after a unit had already moved once on that order. IBWs, the first roll was with normal modifiers, to ‘activate’ the move. Any moves after that receives a +2 if still outside 12” if following the original order.
- Columns/limbered can move in any combination of directions without penalty.
- Any change of direction greater than 45º requires a facing change.
- Low on ammunition can be cleared by expending 1/2 move or by moving out of rifle range.
- Charged artillery that fires at close range and loses close assault is reduced if 1-3, destroyed on 4 or more.
- +1 for higher troop quality in close assault.
Forces
ALLIES
Austrian II.Korps – Gablenz
– Bde Gondrecourt – IR.30 (4 S), IR.34 (4 S), 1 RA
– Bde Dormus – IR.35 (4 S), IR.72 (4 S)
– Bde Nostitz – IR.14 (4 S), IR.27 (4 S), 1 RA
– Bde Tomas – IR.!4 (4 S). IR.80 (4 S)
– Bde Dobrzensky – 2.Dr (3 A), 9 Hu (3 A)
– Reserve – 1 RA
Prussian Combined Guard Division – Mülbe
– 3.Guards (5 V,A)
– 4.Guards (5 V,A)
– 3.Guard Grenadiers (5 V,A)
– 4.Guard Grenadiers (5 V,A)
– Guard Hussars (4 V,A)
– 1 Guard RA
DANISH
de Meza
2.Division – du Plat
– 5.Bde (7), 6.Bde (6), 1 RA, 1 SA
3.Division – Steinmann
– 7.Bde (7), 8.Bde (6), 9.Bde (5), 1 RA
4.Division (Cav) – 1.Bde (4 A), 2.Bde (4 A), 1 SA
Reserve Bde (7)
Army Artillery – 1 RA, 1 SA
I have pretty much settled on a ground scale of 12” = 4000m, a troops scale of 500 infantry/12 guns to a base, and one hour turns for all my BBB scenarios. This is the best mesh of scales within BBB. The results were the Allied force had 20 Prussian and 32 Austrian infantry bases, 4 Prussian and 6 Austrian cavalry bases, and 1 Prussian and 3 Austrian field artillery bases (total 52 infantry, 10 cavalry, and 4 field artillery). The Danes had 38 Infantry, 8 cavalry, and 4 field artillery bases. In addition the Dannevirke had 8 siege gun bases as fortress artillery. What was important was that the Danes were organized as brigades while the Allies were organized as regiments. The result was that the Allies had 12 infantry maneuver elements, while the Danes only had 6. The Austrians had skirmishers while all the Prussian infantry was veteran (they were all guard units).
The first playtest rolled the Reide frozen but good visibility. The second playtest was the opposite. This allows me to see the impact of the two rules. I used the same Danish defensive plan in both scenarios. The battle report below was with limited visibility.
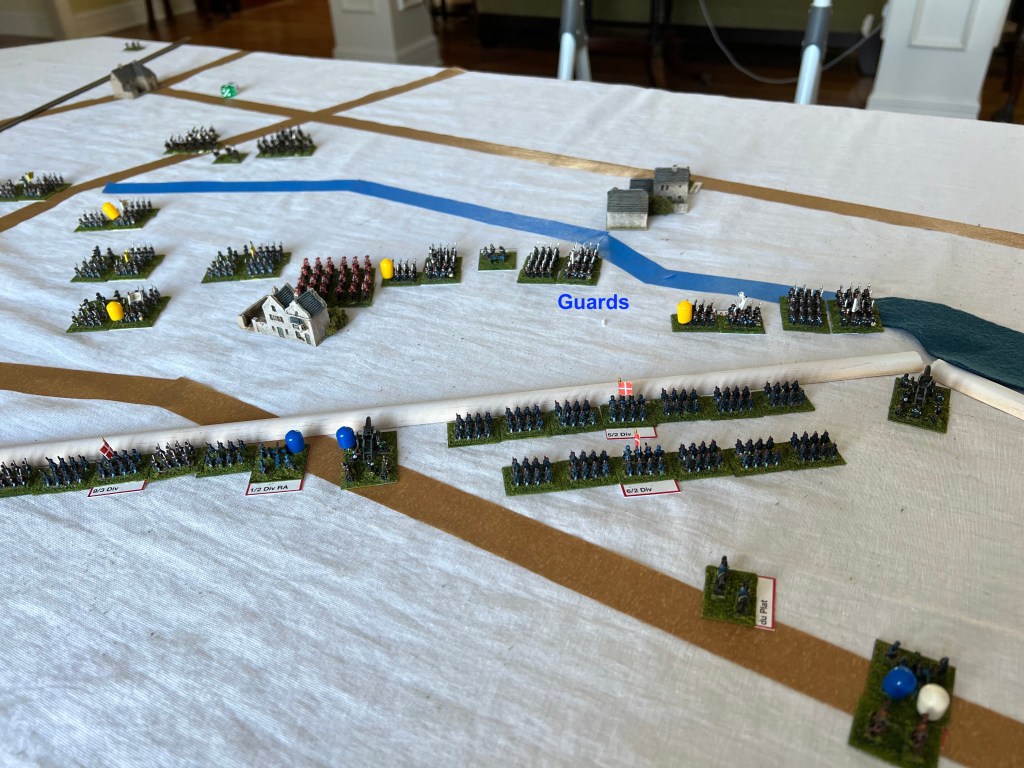
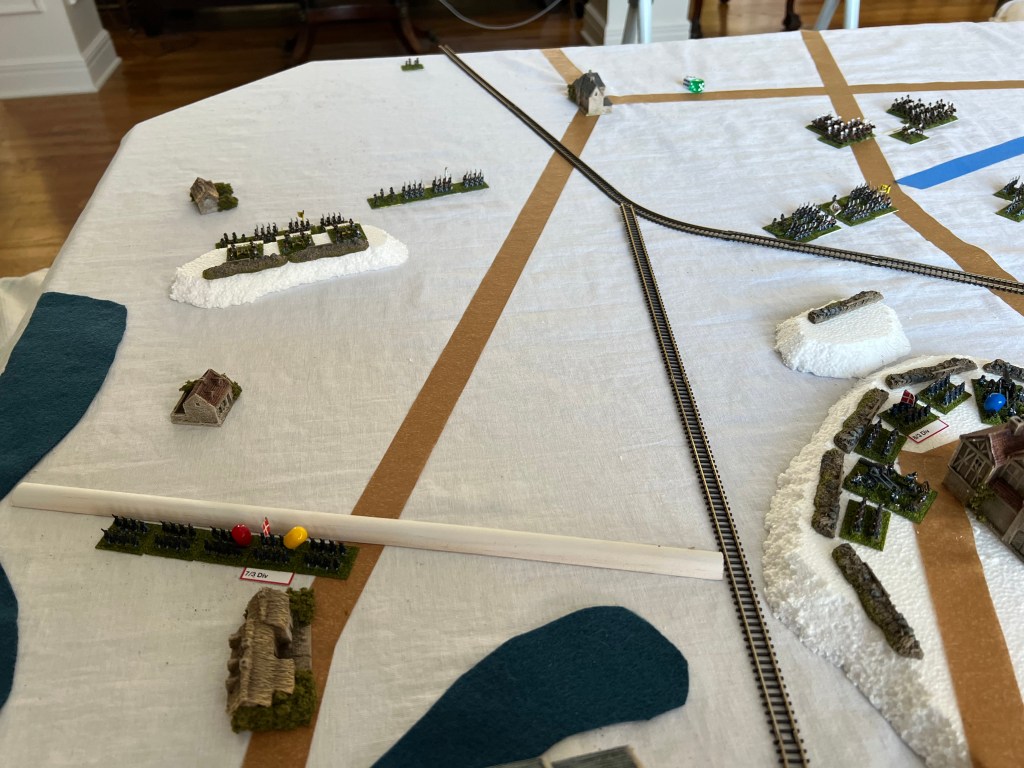
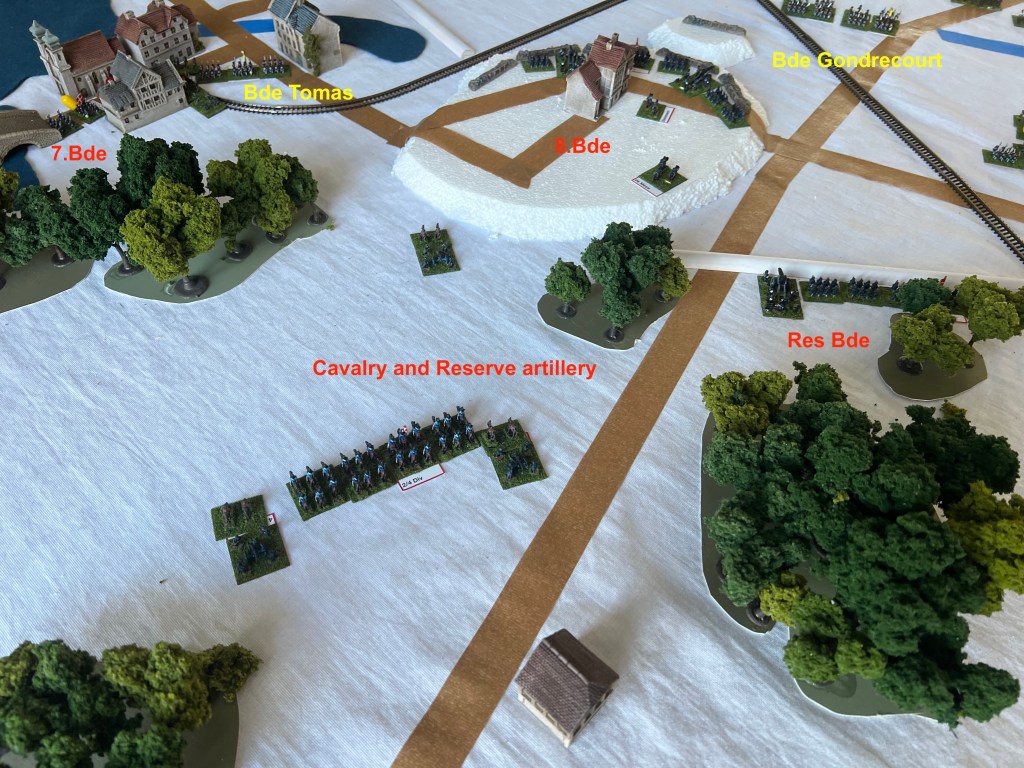
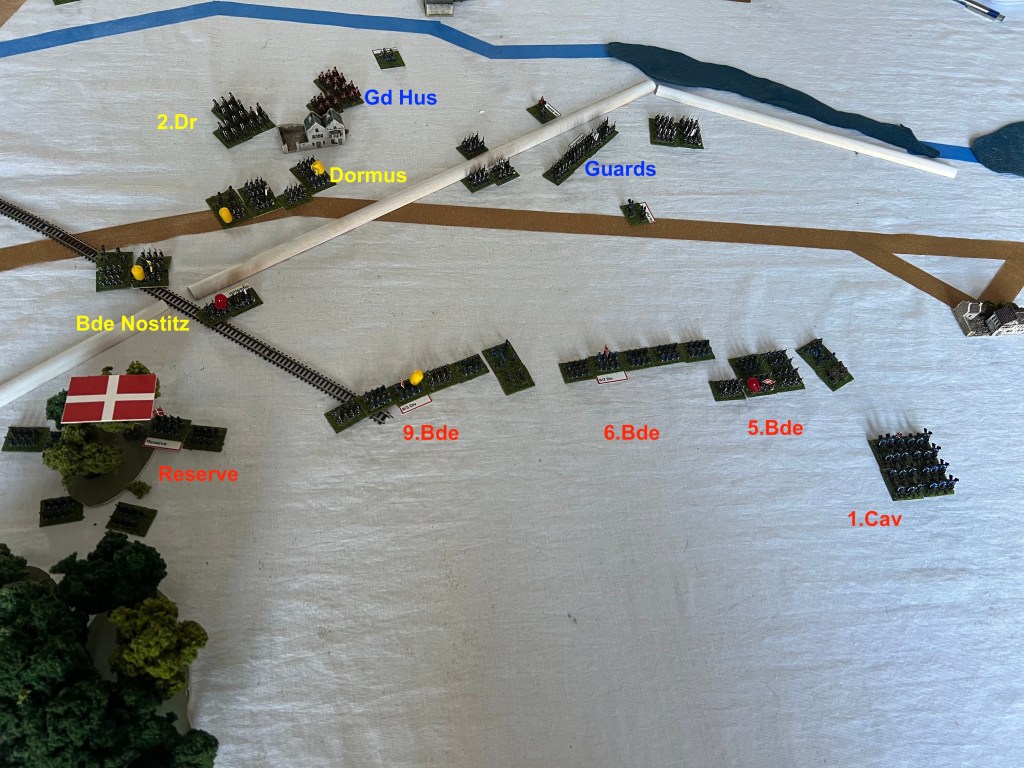
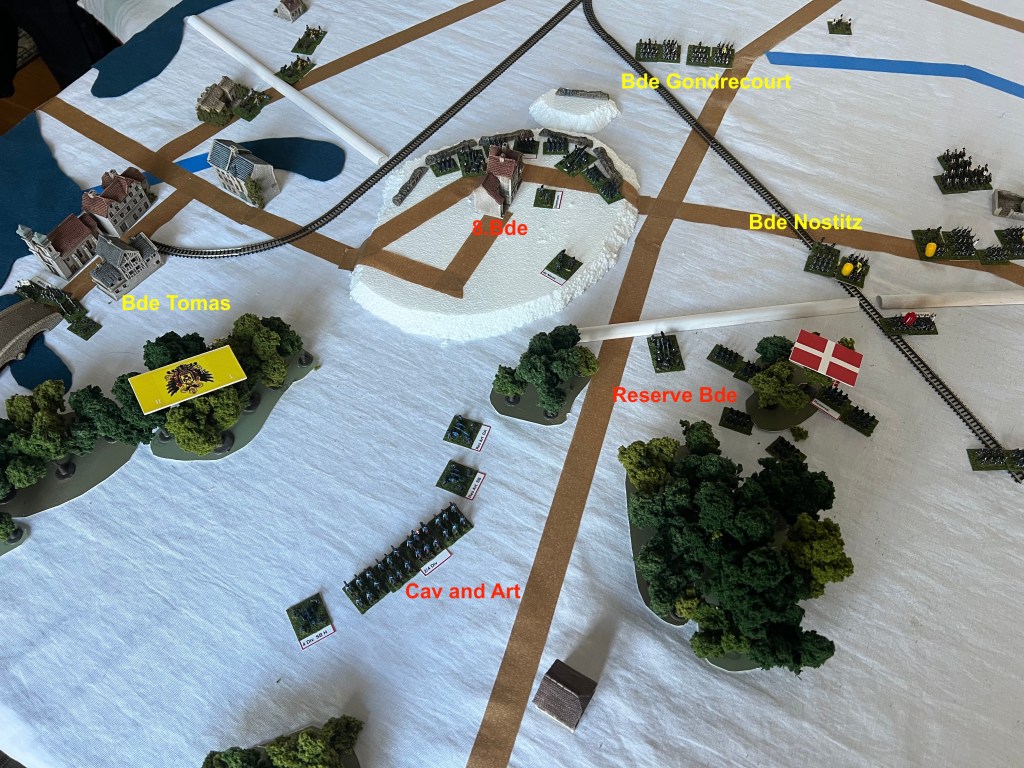
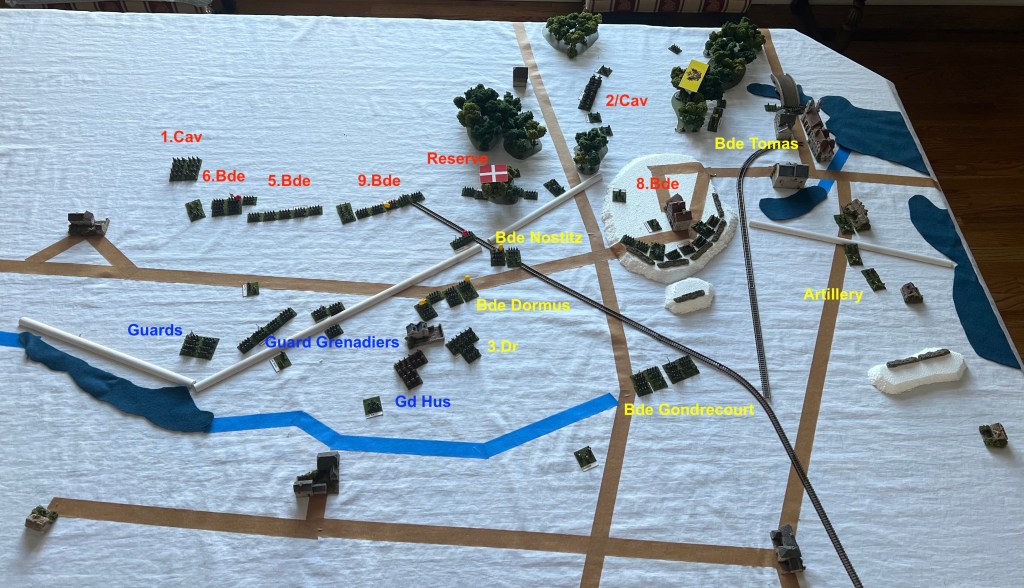
The table with the initial set-up.
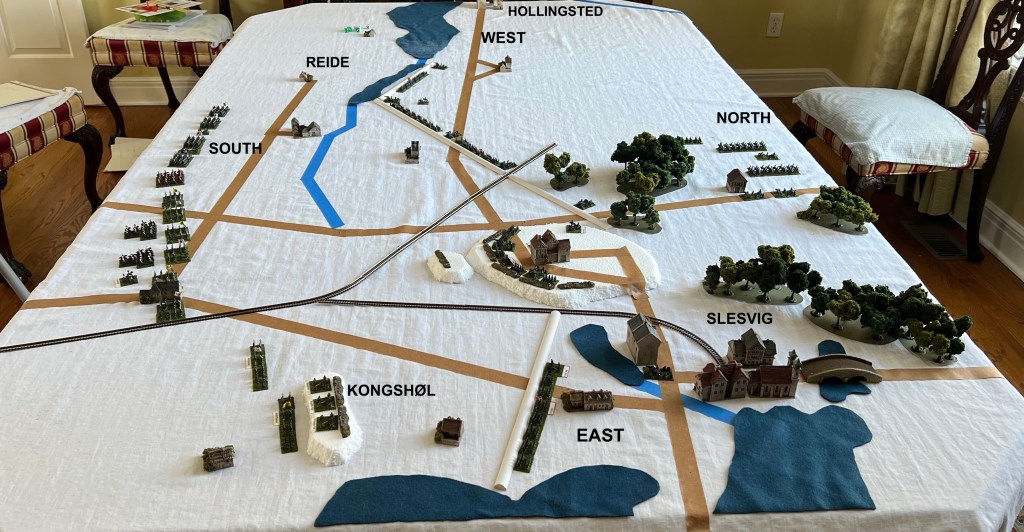
The Danish 5. and 6.Bdes of the 2.Division held the western part of the line while the 7, 8, 9.Bdes of the 3.Division held the eastern part and Slesvig proper. The Reserve Bde was in the center rear and the 4.Division (cavalry) and Reserve Artillery were close to Slesvig. These units would react as needed.
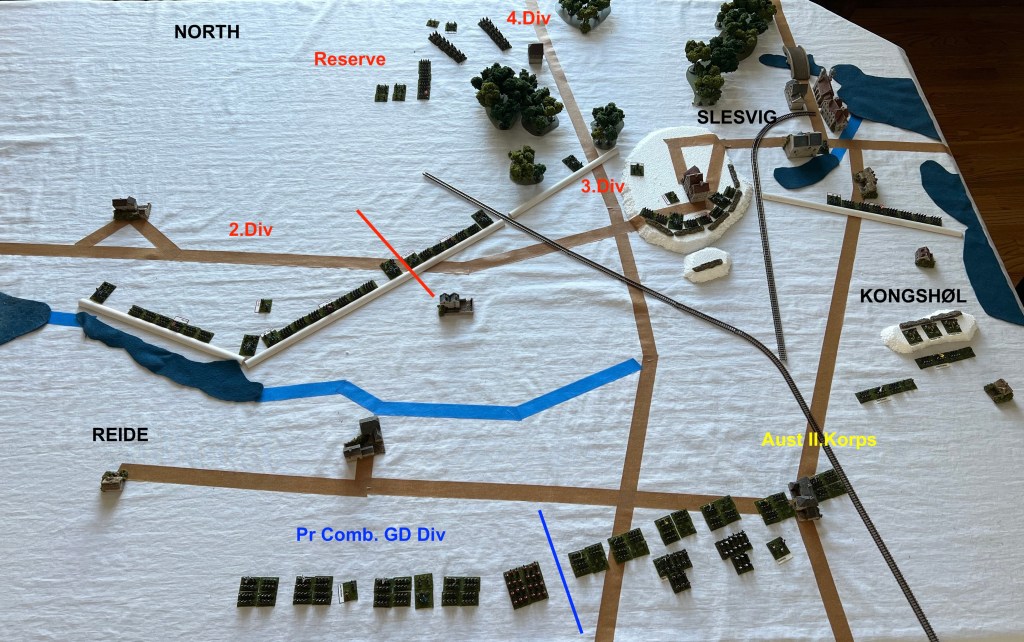
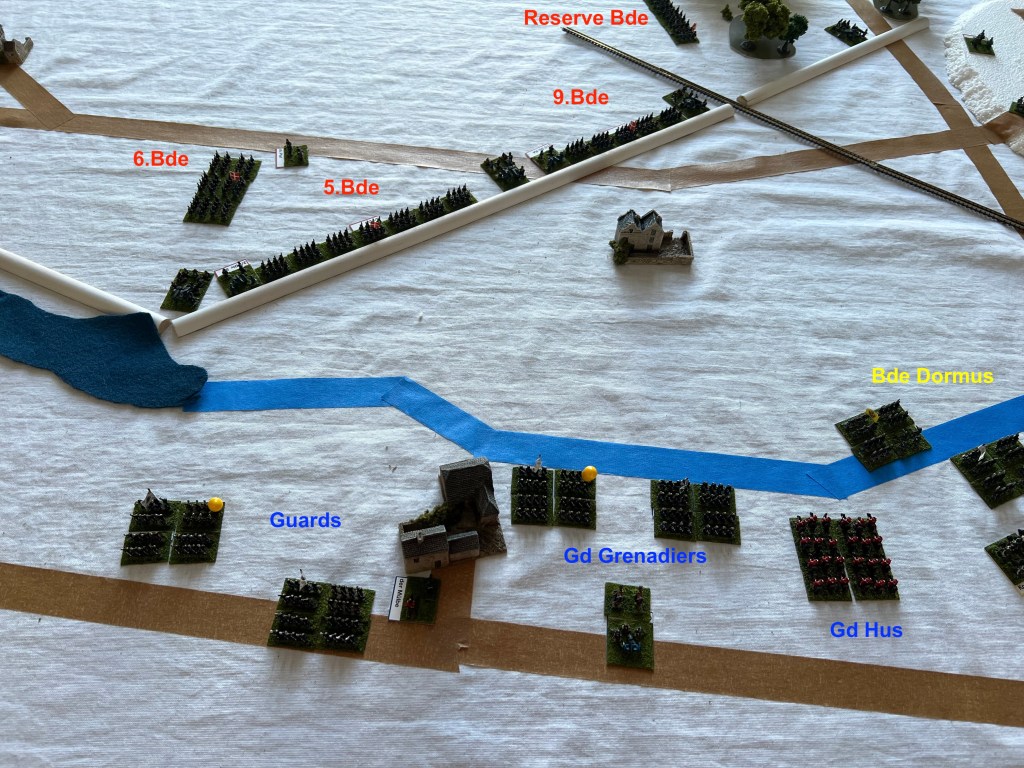
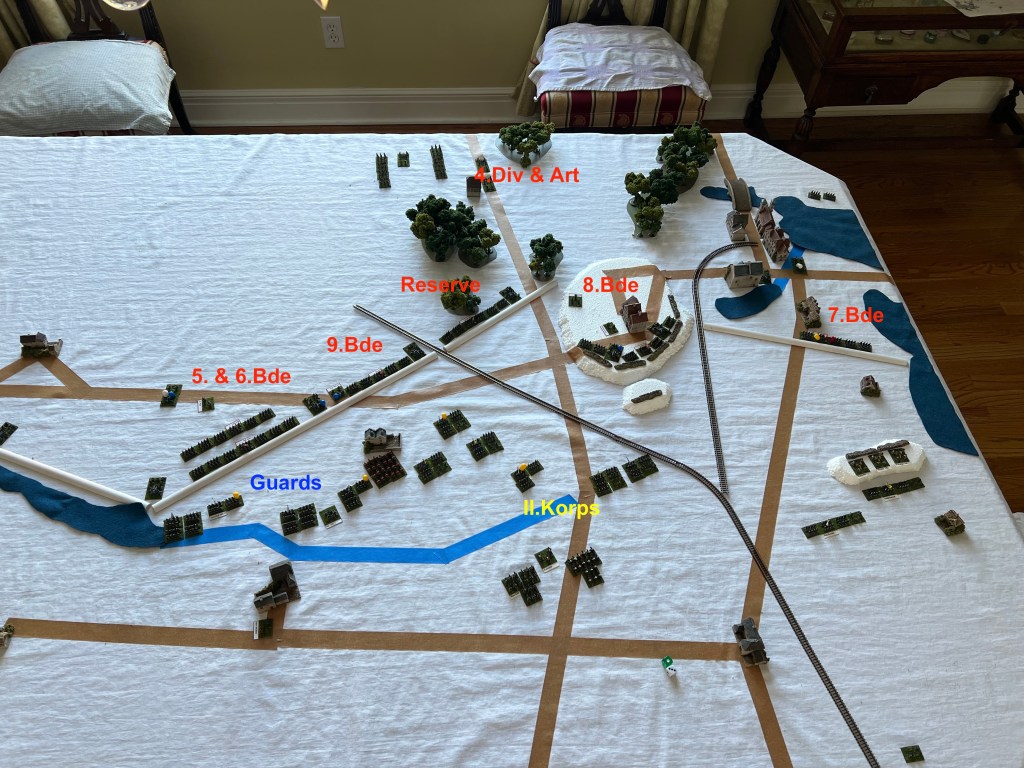
In both games, the Allies decided to attack the Dannevirke proper at its closes point to the Reide at the angle with the Prussian III.Korps. The Austrian II.Korps artillery was set-up on the Kongshøl while the four brigades cover the ground between the two. The left hand Austrian brigades would support the Prussian attack while the other two fixed the Danish forces around Slesvig. The cavalry was held back to exploit any success.
The initial laydown of forces.
0600. All the Allied units began to advance. The 3.GdR only moved half. Most of the Allied advance couldn’t be seen from the defenses, so the only fires were on the extreme left (west) and on the right (east). 4.GdR and 3.GGrR were disputed. Seeing the Prussian advance, the Danes moved the Reserve Bde forward to positions behind the 3.Division while the 6.Bde moves to position itself behind 5.Bde (as the Reide is not frozen, this is a safe move). The Austrian artillery on the Kongshøl did well and silenced the 3.Division’s field guns that were supporting the 7.Bde in the east.
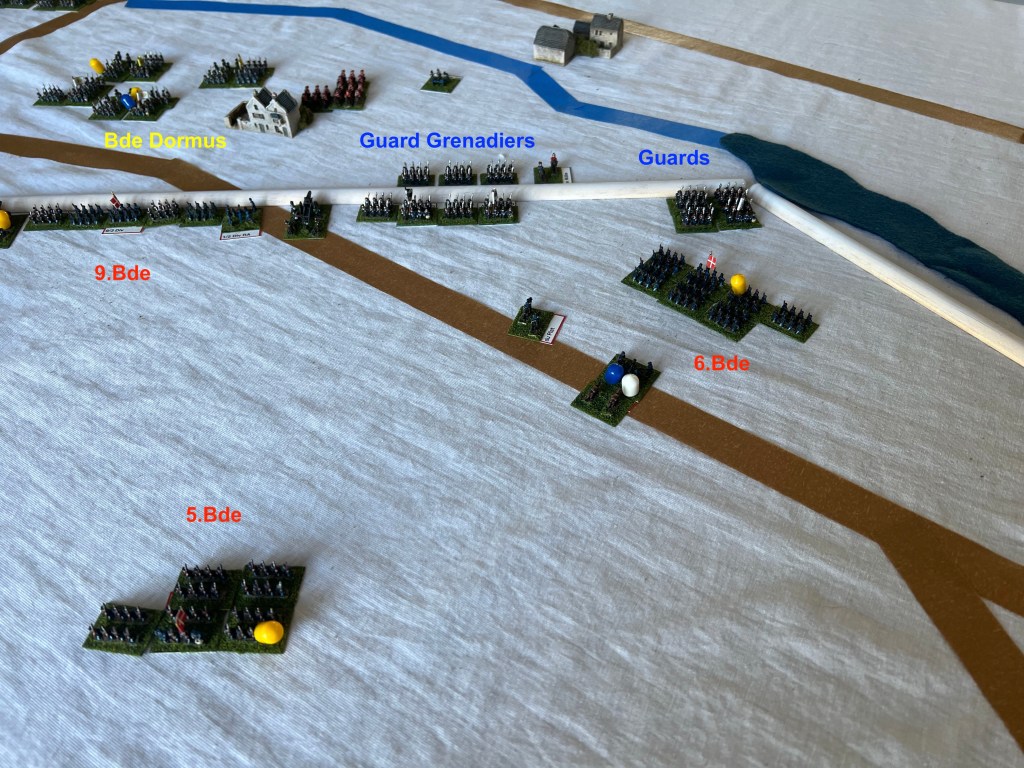
The west.
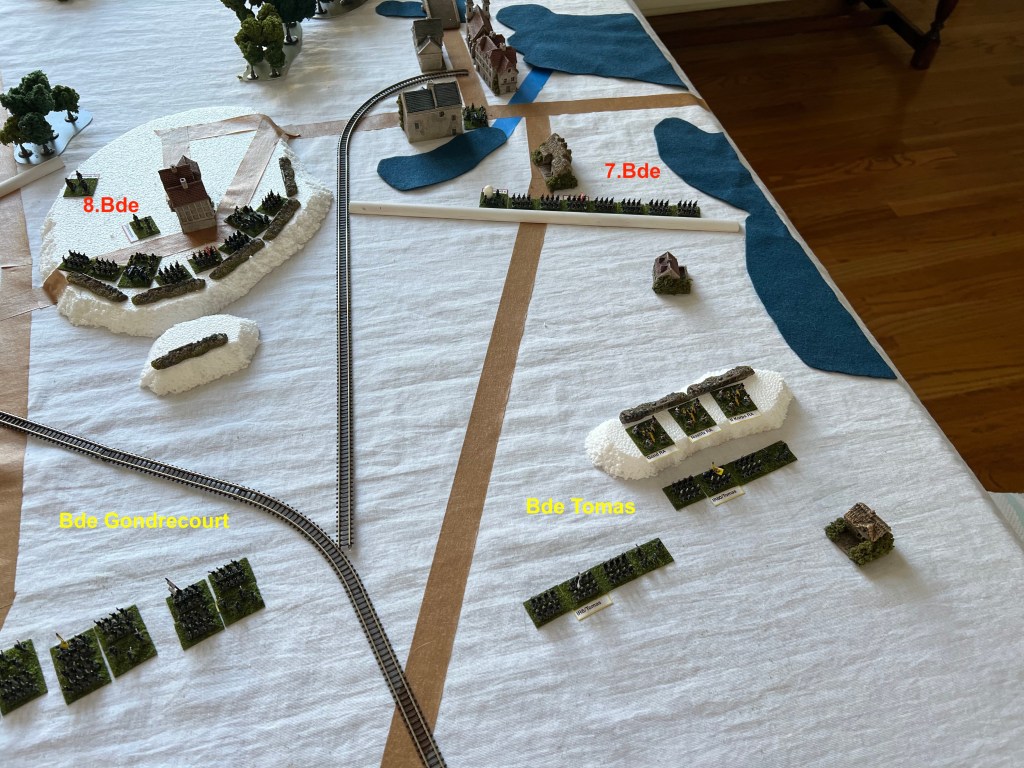
The east
0700. The Danish fire becomes quite hot. 3.GdR loses two bases while and 4.GGrR lost 1 base, but both Danish artillery units go low on ammo. Two other Guard regiments attempt to charge but poor movement rolls stop the effort. In return the Prussians did silence one of the two 2.Division’s field artillery units and disrupt 5.Bde. However 5.Bde recovers and stands ready to repel any assaults. IR.14 loses a base while IR.27 is disrupted by the fortress artillery with the fortress artillery going low on ammo. . In the east the Austrian artillery continues to do well, much better than anticipated. 7.Bde loses two bases and is disrupted/spent. The Austrians sense an unexpected opening and plan to assault at 0800 (rolls willing). The limited visibility prevents most of the fortress guns from being effective in that area.
The west
The east
End of the turn overall.
0800. The Guards assault the 2.Div. The Danish defensive fire is mixed with the 3.GdR overwhelmed (removed) by fire but the other assaults aren’t stopped. The 5.Bde loses a base to offensive fire and is then pushed back by the 3. and 4.GGrR. The 4.GdR overruns the Fortress Guns. The entire southern part of the Dannevirke is in Prussian hands. du Plat has to make a difficult decision. The 3. and 4.GGrR are disrupted, so does he counter attack or pull back his forces. The Danish Army is very offensively minded in 1864 so counter attack it is. The 5.Bde recovers from its disruption and attacks while the 6.Bde moves to block the 4.GdR (I wanted it to counter attack as well, but couldn’t maneuver the brigade into position). The Guards couldn’t stop the attack by fire, but handily won the close assault. 5.Bde lost another base and retreated. The battle for the southern part of the line was lost.
In the east, Bde Tomas makes both of its movement rolls and attacks the 7.Bde. The Danish defensive fire misses while the Austrians cause another base loss on the brigade. The result is bad for the Danes, with the 7.Bde overrun and flees. The Austrians pursues into Slesvig. The only thing that de Meza can do is move through Reserve Artillery and a cavalry brigade to block the Austrians and keep an escape route open for the 8.Bde. He would rather occupy the woods just west of Slesvig, but doesn’t have any infantry available to do so as the 7.Bde fails its movement roll. As the Austrians lack additional forces in the east, de Mea leaves the 8.Bde in place for now to help cover the Reserve Bde.
Overall turn 3
0900. In the west, the Guards and Grenadiers assault the 6.Bde, but the Grenadiers fail their movement roll. The Danish defense fire misses while the Prussian offensive fire causes a base loss. The 4.Gds attack and again win, creating another base loss and retreat. Bde Dormus and Nostitz assault the 9.Bde and the fortress guns. IR.35 fails its roll while IR.72 is stopped by fire. Bde Nostitz does assault and pushes back the 9.Bde while overrunning the fortress guns. The Austrian cavalry was ordered forward but the 9.Hussars were hit hard by the fortress guns and are removed. As all chances for a successful counter attack and now gone, the Danes pull back and organize a defensive to cover their retreat.
In the east Bde Tomas finishes off the 7.Bde while occupying the woods. The Austrian artillery limbers and moves forward to support the advance. The artillery is fired upon but the fortress guns miss. The Danish Reserve Artillery unlimbers to secure the flank with the cavalry.
Overall Turn 4
At this point I called the game. The 8.Bde did make a successful movement roll (I rolled just to see), so the Danish army would likely be able to withdrawal. The Allied cavalry wasn’t in position to pursue and it had already taken some losses. The Prussians lost 9 infantry and 1 cavalry base, the Austrians 3 infantry and 3 cavalry bases, while the Danes lost 11 infantry and 1 artillery base, with all the Dannevirke guns lost as well.
In both games, the Prussian Guards were able to assault and seize the southern part of the Dannevirke but took 50% losses to do so in each game. The limited visibility hurt the Danes more than the Allies in this battle as Allied losses were a few less than the first playtest. It was the limited visibility combined with the excellent rolls of the Austrian artillery that cause the rapid collapse of the 7.Bde. This overwhelmed the limited Danish reserves. In the first playtest after the Guards broke through, the 4.Division, the Reserve Bde, and the Army Artillery were available for counterattacks in the west. In this game, the Danes had to respond to both flanks collapsing. Even if du Plat’s counter attack had succeeded in the 0800 turn, the lack of any infantry in the east meant that Bde Tomas would continue to threaten the Danish position. 8.Bde was fixed by Bde Gondrecourt and couldn’t be used against Bde Tomas without giving up its central position. As de Meza correctly decided in history, the Danish Army was too weak to hold the Dannevirke position.
Each side had hot and cold dice. I used the same dice for both sides (no switching out). The Danes rolled more 11s and 12s which I felt hurt them more than helped as they received several assaults while low on ammo. I feel my house rule that Low on Ammo can be cleared by expending continues to be significantly better than the one in the rules that an infantry unit must be out of rifle range to remove a Low on Ammo. The written rule would have meant that the Danish units would need to abandon the defensives. Even with my rule, there were several instances where the Danish units failed to roll a half move and suffered accordingly.
I do believe there is a better Danish defensive plan. I will need to experiment with it next time I want to play the scenario. This scenario would certainly play better with multiple players rather than solo.
Changes I think should be made in the scenario: I had debated these prior to the two playtests, but went with some standard decisions. In the actual war, the Austrians and the Danes were both quite aggressive while the Prussians were less so. I will look at rating the Danes and Austrians as aggressive while the Prussians will not be. The limited visibility might be better as a -1 at over 6” to the Firefight roll rather than a limit to range. I used what I understood as the Siege/Fortress guns in the Dybbøl scenario in the BBB book (using RA fire factors column), but I am not sure it worked well. Looking at actual smooth bore cannon ranges, using the SA column would have been better. I will look at organizing the fortress artillery as 6 gun bases instead 12 to reflect their larger calibers. I had thought to limit the fortress artillery to firing only during their defensive fire phases in the game to reflect their slower reloading and would help offset the small number of guns per base. The Danes might do be better with more but smaller units. Organizing them as regiments would add flexibility, but almost all the regiments would be three bases. Given the game mechanics, that might be better for them although spent would remove the units from play.
I believe there is much players can do in the this scenario. Historically the possibility of a Danish spoiling attack was discussed at de Meza’s council of war. Remaining passive as I did might not be the best strategy.

Leave a reply to Chris Pringle Cancel reply